前言
主要分析了vue-router的部分源码,从而帮助理解vue-router的相关原理。主要从三个方面分析:
- vue-router插件初始化时所做的工作;
- 当路由发生改变时如何渲染router-view组件;
- 使用router-link是如何进行路由跳转的;
vue-router插件初始化
一般在项目中引入vue-router插件时,所需代码如下
1
2
3
4
5
6
7
8
9
10
11
12
13
14
15
16
17
18
19
20
|
import Vue from 'vue'
import VueRouter from 'vue-rouer'
Vue.use(VueRouter)
const routes = [
{ path: '/foo', component: Foo },
{ path: '/bar', component: Bar }
]
const router = new VueRouter({
routes
})
new Vue({
components: { App },
router,
store,
template: '<App/>'
}).$mount('#app')
|
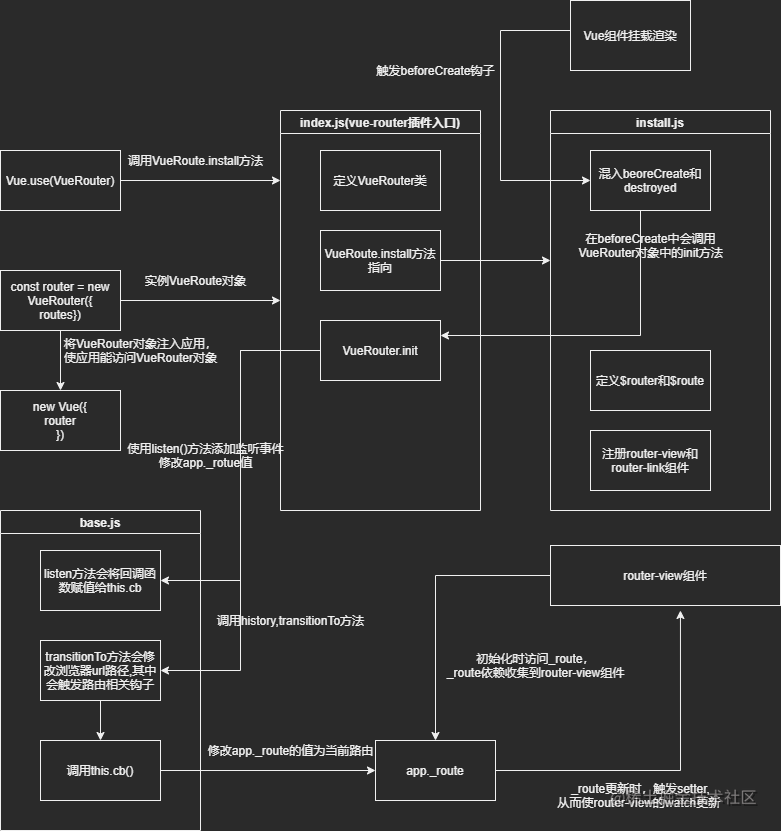
vue-router插件初始化调用的核心文件是index.js,install.js,base.js文件。具体分析如下:
调用install文件
当调用 Vue.use(VueRouter) 时会调用vue-router入口文件中的install方法
1
2
3
4
|
import { install } from './install'
VueRouter.install = install
|
install方法定义在install.js文件中,从源码分析它主要完成以下内容:
在Vue中beforeCreate和destroyed钩子中全局混入代码:
1
2
3
4
5
6
7
8
9
10
11
12
13
14
15
16
| Vue.mixin({
beforeCreate () {
if (isDef(this.$options.router)) {
this._routerRoot = this
this._router = this.$options.router
this._router.init(this)
Vue.util.defineReactive(this, '_route', this._router.history.current)
} else {
this._routerRoot = (this.$parent && this.$parent._routerRoot) || this
}
registerInstance(this, this)
},
destroyed () {
registerInstance(this)
}
})
|
主要作用是当vue组件渲染时,执行以下逻辑:
- 将Vue根实例或者子组件离它最近的父实例赋值给this._routerRoot
- 将this.$options.router (访问 vue的options,在main.js已将其指向vue-router的实例化对象) 赋值给this._router
- 调用vue-router实例化对象的init方法(后文分析)
- 将 this._route 赋值为 this._router.history.curren,并使其为响应式对象
- 执行registerInstance方法(后文分析)
定义this.$router和this.$route属性,方便Vue组件使用
1
2
3
4
5
6
7
8
9
| Object.defineProperty(Vue.prototype, '$router', {
get () { return this._routerRoot._router }
})
Object.defineProperty(Vue.prototype, '$route', {
get () { return this._routerRoot._route }
})
|
注册router-view和router-link组件
1
2
| Vue.component('RouterView', View)
Vue.component('RouterLink', Link)
|
实例化vue-router对象
VueRouter类定义在index.js文件中,当在项目的main.js实例化一个vue-router对象时,在constructor会执行以下逻辑:
1
2
3
4
5
6
7
8
9
10
11
12
13
14
15
16
17
18
19
20
21
22
23
24
25
26
27
28
29
30
31
32
33
34
35
36
37
38
| constructor (options: RouterOptions = {}) {
this.app = null
this.apps = []
this.options = options
this.beforeHooks = []
this.resolveHooks = []
this.afterHooks = []
this.matcher = createMatcher(options.routes || [], this)
let mode = options.mode || 'hash'
this.fallback =
mode === 'history' && !supportsPushState && options.fallback !== false
if (this.fallback) {
mode = 'hash'
}
if (!inBrowser) {
mode = 'abstract'
}
this.mode = mode
switch (mode) {
case 'history':
this.history = new HTML5History(this, options.base)
break
case 'hash':
this.history = new HashHistory(this, options.base, this.fallback)
break
case 'abstract':
this.history = new AbstractHistory(this, options.base)
break
default:
if (process.env.NODE_ENV !== 'production') {
assert(false, `invalid mode: ${mode}`)
}
}
}
|
主要逻辑如下:
- 调用createMatcher方法将传入的路由配置进行处理生成路由匹配器并赋值给this.matcher(后方分析)
- 根据路由创建的模式实例化history对象
Vue组件挂载渲染时VueRouter初始化
当Vue组件渲染时会触发beforeCreate钩子,从上文可以得知如果是根实例时会触发VueRouter实例的init方法,传入根实例的this。
1
2
3
4
5
6
7
8
9
10
11
12
13
14
15
16
17
18
19
20
21
22
23
24
25
26
27
28
29
30
31
32
33
34
35
36
| init (app: any ) {
this.apps.push(app)
if (this.app) {
return
}
this.app = app
const history = this.history
if (history instanceof HTML5History || history instanceof HashHistory) {
const handleInitialScroll = routeOrError => {
const from = history.current
const expectScroll = this.options.scrollBehavior
const supportsScroll = supportsPushState && expectScroll
if (supportsScroll && 'fullPath' in routeOrError) {
handleScroll(this, routeOrError, from, false)
}
}
const setupListeners = routeOrError => {
history.setupListeners()
handleInitialScroll(routeOrError)
}
history.transitionTo(
history.getCurrentLocation(),
setupListeners,
setupListeners
)
}
history.listen(route => {
this.apps.forEach(app => {
app._route = route
})
})
}
|
主要逻辑如下:
- 调用history.transitionTo方法去更新修改浏览器url路径
- 添加history事件监听,当浏览器url路径更新时,更新app._route(app._route是在上文install文件中的响应式对象_route)
需要注意的是在transitionTo中会调用confirmTransition方法去执行路由导航守卫钩子。
router-view渲染机制
在上文中,已经知道浏览器url改变时会触发app._route更新,而它在初始化时被设为响应式对象。
在router-view源码中可以看到在执行render函数时会调用parnet.$route, 由于 route是响应式对象,当访问 route 时会使 router-view组件对 route有依赖。
1
2
3
4
5
6
7
8
9
| render (_, { props, children, parent, data }) {
const route = parent.$route
const matched = route.matched[depth]
const component = matched && matched.components[name]
return h(component, data, children)
}
|
在install文件中,可以看到获取 $route 的值时,返回的是 _router。
1
2
3
| Object.defineProperty(Vue.prototype, '$route', {
get () { return this._routerRoot._route }
})
|
结合上面的分析,当浏览器url改变时,会修改 _route的值,而 _route是一个响应式对象,它更新时会触发setter,从而通知route-view的渲染watcher更新,重新渲染组件。
router-link跳转机制
router-link定义在文件src/components/link中,主要的点击跳转代码如下:
1
2
3
4
5
6
7
8
9
10
11
12
13
14
15
16
17
18
19
| const router = this.$router
const handler = e => {
if (guardEvent(e)) {
if (this.replace) {
router.replace(location, noop)
} else {
router.push(location, noop)
}
}
}
const on = { click: guardEvent }
if (Array.isArray(this.event)) {
this.event.forEach(e => {
on[e] = handler
})
} else {
on[this.event] = handler
}
|
当router-link触发点击事件时,会执行router.replace或者push方法,从上文可以得知this.$router是vue-router的实例对象,replace和push方法定义在index.js文件中。
1
2
3
4
5
6
7
8
9
10
11
12
13
14
15
16
17
18
19
20
21
| push (location: RawLocation, onComplete?: Function, onAbort?: Function) {
if (!onComplete && !onAbort && typeof Promise !== 'undefined') {
return new Promise((resolve, reject) => {
this.history.push(location, resolve, reject)
})
} else {
this.history.push(location, onComplete, onAbort)
}
}
replace (location: RawLocation, onComplete?: Function, onAbort?: Function) {
if (!onComplete && !onAbort && typeof Promise !== 'undefined') {
return new Promise((resolve, reject) => {
this.history.replace(location, resolve, reject)
})
} else {
this.history.replace(location, onComplete, onAbort)
}
}
|
可以看到会访问history实例化对象中的replace和push方法,不同的modepush和replace定义不同,当mode为hashj时,会访问到hash.js中,主要代码如下:
1
2
3
4
5
6
7
8
9
10
11
12
13
14
15
16
17
18
19
20
21
22
23
24
25
| push (location: RawLocation, onComplete?: Function, onAbort?: Function) {
const { current: fromRoute } = this
this.transitionTo(
location,
route => {
pushHash(route.fullPath)
handleScroll(this.router, route, fromRoute, false)
onComplete && onComplete(route)
},
onAbort
)
}
replace (location: RawLocation, onComplete?: Function, onAbort?: Function) {
const { current: fromRoute } = this
this.transitionTo(
location,
route => {
replaceHash(route.fullPath)
handleScroll(this.router, route, fromRoute, false)
onComplete && onComplete(route)
},
onAbort
)
}
|
push和reaplace方法都会调用transitionTo方法去修改浏览器url(主要不同是修改浏览器url的方式不同),从而触发 router-view 组件重新渲染,进且更新页面。
总结
从上文可以看出,vue-router的主要原理是通过监听浏览器url的改变,来触发router-view组件根据路由定义的组件重新渲染页面。而调用路由的push,replace等方法时,最终都会触发改变浏览器的url。从而保证了组件的及时刷新。
参考资料